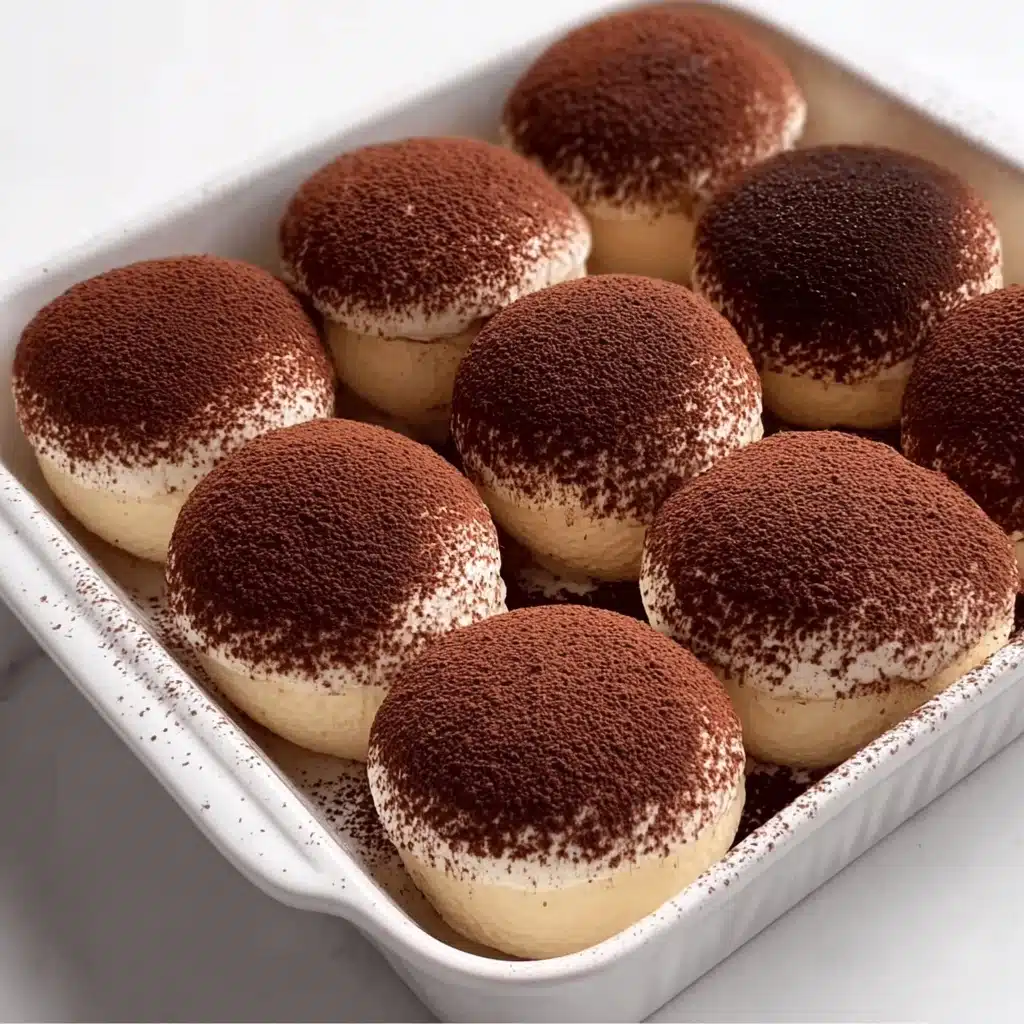
10 Minute Tiramisu Balls: Quick and Delicious Treats Recipe
There is something irresistibly charming about 10 Minute Tiramisu Balls: Quick and Delicious Treats that makes them perfect for when you crave a luscious dessert without spending hours in the kitchen. These little bites capture all the classic flavors of tiramisu—rich espresso, creamy mascarpone, and a hint of cocoa—in a playful, bite-sized form. Whether you’re surprising guests or indulging in a sweet snack, they come together quickly, delivering a delightful treat that feels both elegant and comforting.

Ingredients You’ll Need
The magic of these tiramisu balls lies in a handful of simple ingredients that work beautifully together to create layers of flavor and texture. Each component plays an essential role, from the crunchy crumbly ladyfingers to the creamy mascarpone that binds everything into smooth bliss.
- 200g ladyfingers (savoiardi): These light, airy biscuits provide the perfect base with their subtly sweet flavor and crisp texture.
- ½ cup brewed espresso, cooled: Adds authentic coffee richness essential to tiramisu’s signature taste.
- 250g mascarpone cheese: This creamy Italian cheese brings the luscious, velvety texture that makes tiramisu so dreamy.
- ½ cup powdered sugar: Sweetens the mixture gently without overpowering the delicate flavors.
- 1 tablespoon cocoa powder: Offers a touch of bitter chocolate depth in the mixture, balancing the sweetness.
- 1 tablespoon coffee liqueur (optional): For a little adult kick and added complexity.
- 1 teaspoon vanilla extract: Enhances the overall flavor with warm, comforting notes.
- Pinch of salt: Unlocks the sweetness and rounds out the flavor profile.
- Additional cocoa powder for dusting: For that final, elegant finishing touch that looks as good as it tastes.
How to Make 10 Minute Tiramisu Balls: Quick and Delicious Treats
Step 1: Crush the Ladyfingers
Start by placing your ladyfingers in a food processor and pulse until they become fine crumbs. This crumbly texture is crucial as it will bind the tiramisu balls and give them that familiar, delightful crunch inside.
Step 2: Whip Up the Mascarpone Mixture
In a large bowl, combine mascarpone cheese, powdered sugar, vanilla extract, and a pinch of salt. Use a spatula or electric mixer to blend until smooth and creamy. This mixture will be the luscious heart of your tiramisu balls, so take a moment to enjoy its velvety texture.
Step 3: Add Coffee and Liqueur
Pour in the cooled espresso and the optional coffee liqueur. Stir gently until everything melds together, infusing the mascarpone with that rich coffee flavor that makes tiramisu unforgettable.
Step 4: Fold in the Crumbs
Gradually incorporate the ladyfinger crumbs into the mascarpone mixture. Fold carefully to keep a uniform texture, making sure the crumbs are completely incorporated for perfect bite-sized delectables.
Step 5: Shape the Balls
Using clean hands, scoop out small portions of the mixture and roll them into balls roughly the size of a walnut. This hands-on step is not only fun but also allows you to gauge the size and firmness of each ball.
Step 6: Dust and Chill
Place each tiramisu ball onto a lined tray and dust generously with cocoa powder. Then pop them in the refrigerator for at least 30 minutes to allow them to set and the flavors to mingle. If you prefer them softer and creamier, feel free to enjoy them straight away!
How to Serve 10 Minute Tiramisu Balls: Quick and Delicious Treats
Garnishes
Sprinkle a fresh dusting of cocoa powder just before serving to invigorate the senses and enhance the classic tiramisu essence. For a pop of color, consider adding dark chocolate shavings or a few espresso beans on top—they look elegant and taste divine.
Side Dishes
These tiramisu balls pair beautifully with a scoop of vanilla gelato or a cup of freshly brewed coffee to complement the coffee notes. For a lighter pairing, try serving them alongside fresh berries, which bring a nice tangy contrast that lifts the whole experience.
Creative Ways to Present
Take these little treats to the next level by serving them in mini dessert cups layered with whipped cream, or skewer a few on cocktail picks for a fun party platter. You could even place them in pretty cupcake liners for an inviting touch that makes each bite feel special.
Make Ahead and Storage
Storing Leftovers
If you happen to have leftovers, store the tiramisu balls in an airtight container in the refrigerator for up to 3 days. This keeps them fresh while allowing the flavors to mellow and deepen even further.
Freezing
You can freeze 10 Minute Tiramisu Balls: Quick and Delicious Treats by arranging them on a baking sheet first, then transferring to a sealed freezer-safe bag or container once frozen solid. When you’re ready, thaw them overnight in the fridge to maintain their soft, creamy texture.
Reheating
Tiramisu balls are best enjoyed chilled, so reheating is not recommended. Instead, simply let frozen tiramisu balls thaw in the refrigerator before serving for the best taste and feel.
FAQs
Can I make 10 Minute Tiramisu Balls without coffee liqueur?
Absolutely! Coffee liqueur is optional and adds a nice depth, but leaving it out still results in delicious tiramisu balls with classic coffee flavor from the espresso.
How long do these tiramisu balls last in the refrigerator?
They stay fresh and tasty for up to 3 days when kept in an airtight container, making them a convenient make-ahead dessert.
Can I use instant coffee instead of brewed espresso?
You can, but brewed espresso usually provides a richer and more authentic coffee flavor. If using instant, dissolve it in hot water and let it cool before adding.
Is it necessary to chill the tiramisu balls before serving?
Chilling helps them set and makes them easier to handle, but if you like a creamier texture, they can be served immediately.
Can I make these tiramisu balls gluten-free?
Yes, substitute the ladyfingers with a gluten-free alternative or use gluten-free cookies to keep the texture similar while accommodating dietary needs.
Final Thoughts
If you’re searching for a sweet treat that is both effortless and utterly delightful, 10 Minute Tiramisu Balls: Quick and Delicious Treats are your new best friend in the kitchen. They bring all the richness of tiramisu in a fun, bite-sized package that everyone will love. Give this recipe a try—you might just find yourself making them again and again!
Print10 Minute Tiramisu Balls: Quick and Delicious Treats Recipe

These 10 Minute Tiramisu Balls are a quick and delicious no-bake treat inspired by the classic Italian dessert. Combining the rich flavors of coffee, mascarpone cheese, and cocoa, these bite-sized morsels are perfect for an elegant party appetizer or a simple indulgent snack, ready in just minutes.
- Prep Time: 10 minutes
- Cook Time: 0 minutes
- Total Time: 40 minutes (including chilling time)
- Yield: 12–15 tiramisu balls 1x
- Category: Dessert
- Method: No-Bake, Mixing
- Cuisine: Italian
- Diet: Vegetarian
Ingredients
Base
- 200g ladyfingers (savoiardi)
- ½ cup brewed espresso, cooled
- 1 tablespoon coffee liqueur (optional)
Mascarpone Mixture
- 250g mascarpone cheese
- ½ cup powdered sugar
- 1 teaspoon vanilla extract
- Pinch of salt
Finishing
- 1 tablespoon cocoa powder
- Additional cocoa powder for dusting
Instructions
- Crush the ladyfingers: Using a food processor, crush the ladyfingers until they form fine, even crumbs, creating the base texture for the tiramisu balls.
- Mix mascarpone mixture: In a large bowl, combine mascarpone cheese, powdered sugar, vanilla extract, and a pinch of salt. Stir or whisk until smooth and creamy, ensuring no lumps remain.
- Add espresso and liqueur: Pour the cooled espresso and optional coffee liqueur into the mascarpone mixture. Mix thoroughly to infuse the rich coffee flavor evenly throughout.
- Fold in ladyfinger crumbs: Gradually fold the crushed ladyfinger crumbs into the creamy mixture until well combined and homogenous, ensuring the mixture holds together when shaped.
- Shape the balls: With clean hands, take small portions of the mixture and roll them into walnut-sized balls, pressing gently to maintain shape without cracking.
- Dust with cocoa powder: Place the formed balls on a lined tray and dust them generously with cocoa powder to add a classic tiramisu finish.
- Chill or serve: Refrigerate the tiramisu balls for at least 30 minutes to firm up and deepen flavors, or serve immediately for a softer, creamier texture.
Notes
- For a stronger coffee flavor, use espresso powder instead of brewed espresso.
- Coffee liqueur is optional but adds a traditional tiramisu depth of flavor.
- Store leftovers in an airtight container in the refrigerator for up to 3 days.
- For a vegan version, substitute mascarpone with a vegan cream cheese alternative and use vegan ladyfingers or cookies.
- Dust with cocoa powder just before serving to avoid it becoming soggy.
Nutrition
- Serving Size: 1 tiramisu ball (approx. 25g)
- Calories: 110 kcal
- Sugar: 8g
- Sodium: 30mg
- Fat: 7g
- Saturated Fat: 4.5g
- Unsaturated Fat: 2g
- Trans Fat: 0g
- Carbohydrates: 10g
- Fiber: 0.5g
- Protein: 2g
- Cholesterol: 25mg
Keywords: tiramisu balls, tiramisu dessert, no-bake tiramisu, quick dessert, coffee dessert, Italian dessert, mascarpone dessert