No-Bake Oreo Cheesecake Cups Recipe
Introduction
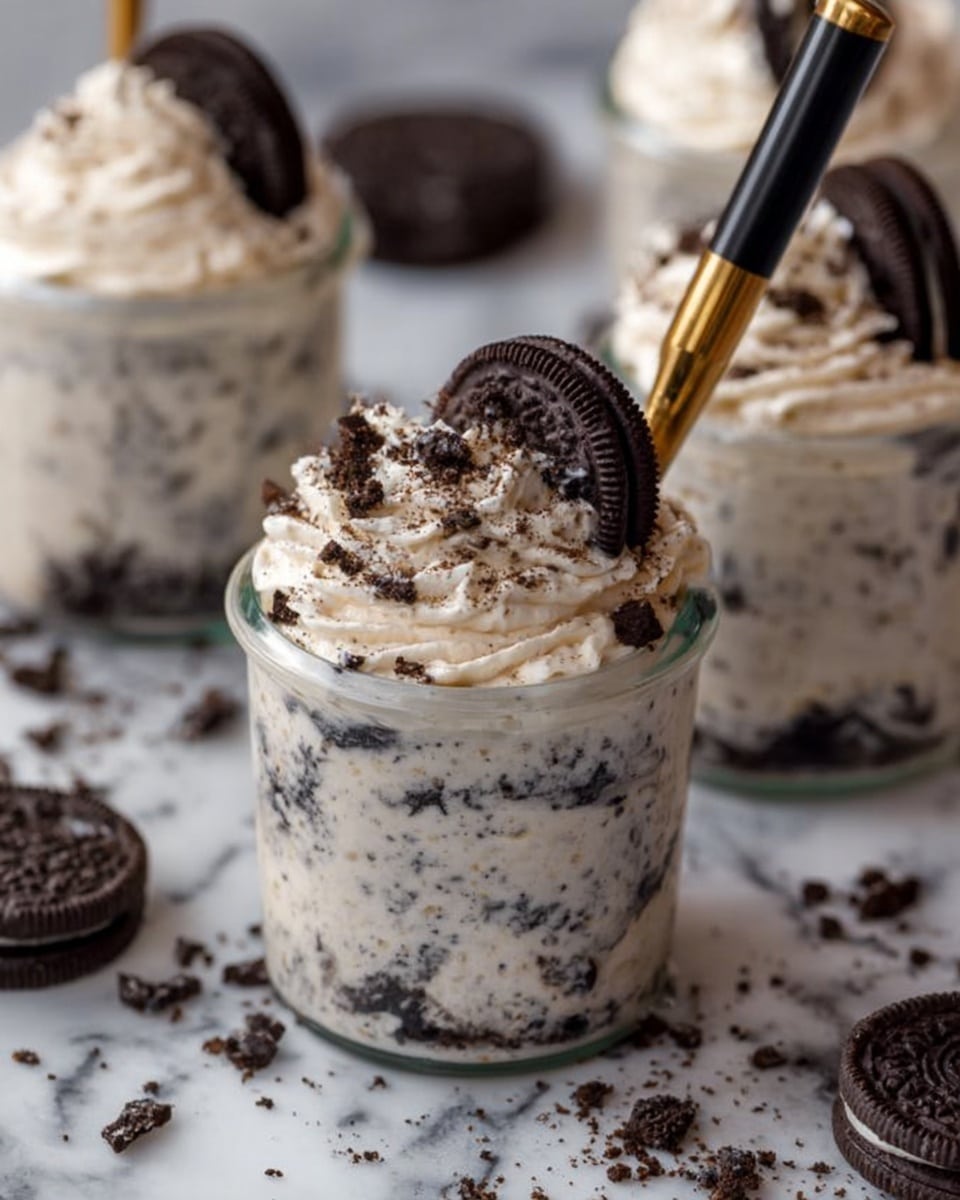
These No-Bake Oreo Cheesecake Cups are a simple and delightful treat perfect for any occasion. With a creamy cheesecake filling and crunchy Oreo base, they’re easy to make and sure to satisfy your sweet tooth.
Ingredients
- 1 8 oz block of cream cheese, softened
- 1 8 oz Cool Whip or whipped topping
- 2/3 cup powdered sugar
- 1 teaspoon vanilla extract
- 24-26 Oreo cookies (more as desired)
Instructions
- Step 1: Place the Oreos in a plastic bag and seal it. Use a rolling pin or a sturdy wooden spoon to crush the Oreos into small pieces. Spoon 1 1/2 to 2 tablespoons of the crushed Oreos into the bottom of six small dessert dishes, each about 3/4 to 1 cup in size. Set aside.
- Step 2: In a mixing bowl, whip the cream cheese and powdered sugar together using a hand or stand mixer until smooth and creamy. Add the vanilla extract and mix until combined. Gently fold in the Cool Whip until fully incorporated, then fold in the remaining crushed Oreos.
- Step 3: Divide the cheesecake filling evenly among the prepared dishes, gently pressing it onto the Oreo base. Chill the cups in the refrigerator for about 1 hour or until ready to serve.
- Step 4: Before serving, top each cup with a dollop of whipped cream and sprinkle with extra crushed Oreos if desired. Enjoy your no-bake treat!
Tips & Variations
- For a richer flavor, use full-fat cream cheese and real whipped cream instead of Cool Whip.
- Add a drizzle of chocolate syrup or caramel on top for an extra indulgent twist.
- If you prefer, substitute the Oreo base with crushed graham crackers or chocolate cookies.
- Make these cups in clear glasses to show off the layers and impress your guests.
Storage
Store the cheesecake cups covered in the refrigerator for up to 3 days. Avoid freezing, as the texture may change. When ready to serve, let them sit at room temperature for about 10 minutes to soften slightly, then enjoy chilled.
How to Serve

Serve this delicious recipe with your favorite sides.
FAQs
Can I make these cheesecake cups ahead of time?
Yes, you can prepare the dessert cups a day in advance and keep them refrigerated until serving. This makes them ideal for parties and gatherings.
What can I use instead of Cool Whip?
You can use homemade whipped cream or store-bought whipped cream as a substitute for Cool Whip. Just make sure it’s slightly stabilized to maintain the texture of the cheesecake filling.
PrintNo-Bake Oreo Cheesecake Cups Recipe

This No-Bake Oreo Cheesecake Cups recipe offers a quick and delightful dessert that combines creamy cheesecake filling with crunchy Oreo cookie crumbs. Perfect for small gatherings or an easy treat, these individual cups require no baking and come together in minutes, delivering a rich and indulgent flavor with a fun Oreo twist.
- Prep Time: 15 minutes
- Cook Time: 0 minutes
- Total Time: 1 hour 15 minutes (including chilling time)
- Yield: 6 servings 1x
- Category: Dessert
- Method: No-Cook
- Cuisine: American
- Diet: Vegetarian
Ingredients
Crust
- 24–26 Oreo cookies (more as desired)
Cheesecake Filling
- 1 8 oz block of cream cheese, softened
- 2/3 cup powdered sugar
- 1 teaspoon vanilla extract
- 8 oz Cool Whip or whipped topping
Topping
- Whipped cream (optional, for garnish)
- Additional crushed Oreos (for garnish)
Instructions
- Crush the Oreos: Place the Oreos in a plastic bag and seal it tightly. Use a rolling pin or a sturdy wooden spoon to crush the Oreos until they reach a fine crumb consistency. Spoon 1 1/2 to 2 tablespoons of the crushed Oreos into the bottom of 6 small dessert dishes (each holding about 3/4 cup to 1 cup). Set these aside as the crust base.
- Prepare the cheesecake filling: In a mixing bowl, use a hand mixer or stand mixer to beat the softened cream cheese and powdered sugar together until the mixture is creamy and smooth. Add the vanilla extract and continue beating to combine thoroughly. Next, gently fold in the Cool Whip to keep the mixture light and airy. Finally, fold in the remaining crushed Oreos to add texture and flavor to the filling.
- Assemble the cheesecake cups: Evenly divide the cheesecake filling among the prepared dishes, pressing it gently over the Oreo crust layer at the bottom. This forms the creamy middle layer of the dessert. Once assembled, place the cups in the refrigerator and chill for about 1 hour or until firm and ready to serve.
- Add finishing touches and serve: Before serving, top each cheesecake cup with a dollop of whipped cream and sprinkle additional crushed Oreos on top for garnish. Enjoy these rich, no-bake treats chilled for the best flavor and texture.
Notes
- Make sure the cream cheese is softened to room temperature for smooth mixing.
- You can substitute Cool Whip with homemade whipped cream if preferred.
- Adjust the quantity of Oreo cookies to suit your desired crust thickness.
- These cheesecake cups can be prepared a day ahead and stored covered in the refrigerator.
- For a stronger vanilla flavor, use pure vanilla extract instead of imitation.
Keywords: No-Bake, Oreo, Cheesecake, Dessert Cups, Easy Dessert, No Bake Cheesecake, Oreo Cheesecake