Chocolate Cherry Upside Down Cake Recipe
If you’re looking for a show-stopping dessert that blends rich chocolate with sweet-tart cherries in a delightful way, the Chocolate Cherry Upside Down Cake is your new best friend. This cake swaps the classic pineapple for luscious cherry pie filling and pairs it perfectly with moist chocolate cake, all baked in a single pan to create a beautiful, glossy topping when flipped. It’s a nostalgic yet fresh twist that delivers melt-in-your-mouth happiness with every bite, making it a dessert you’ll return to time and again.

Ingredients You’ll Need
The magic of this Chocolate Cherry Upside Down Cake lies in its simplicity. Each ingredient plays a vital role in building that perfect balance of flavors and textures, from the gooey cherry topping to the tender chocolate crumb beneath. Using easy-to-find pantry staples means you can whip it up anytime the craving hits.
- Cherry pie filling: Provides sweet, juicy cherries that caramelize beautifully on top for that signature upside-down effect.
- Unsalted butter: Adds richness and helps brown the sugar to create a luscious base for the cherries.
- Brown sugar: Gives a deep molasses-sweetness that balances the tartness of the cherries perfectly.
- Chocolate cake mix: Acts as the base—an easy way to get moist, fluffy chocolate cake every time.
- Eggs: Help bind the batter and add structure to the cake.
- Vegetable oil: Keeps the cake moist and tender without overpowering the flavors.
- Water: Needed to thin out the cake mix for that perfect consistency.
- Vanilla extract: Enhances the chocolate while adding a warm, aromatic touch.
How to Make Chocolate Cherry Upside Down Cake
Step 1: Prepare the Topping
Start by preheating your oven to 350°F (175°C) and greasing a 9×13-inch baking pan thoroughly. Pour the melted unsalted butter evenly into the bottom of the pan, then sprinkle the brown sugar evenly over the butter. This combination will caramelize during baking, creating a decadent, glossy base. Finish by spreading the cherry pie filling generously on top of the sugar layer, making sure it’s even to ensure every slice has that classic fruit topping.
Step 2: Make the Cake Batter
In a large mixing bowl, combine your chocolate cake mix with the eggs, vegetable oil, water, and vanilla extract. Beat everything together until the batter is smooth and uniform. This is your chance to appreciate how simple ingredients can transform into a luxuriously rich cake batter with a deep chocolate aroma that will fill your kitchen.
Step 3: Assemble and Bake
Carefully pour the chocolate cake batter over your cherry topping in the pan, smoothing it out gently with a spatula. The batter should cover the cherries completely—don’t worry, they’ll peek through after baking! Place the pan in the oven and bake for 35-40 minutes. You’ll know it’s done when a toothpick inserted in the center comes out clean and the edges have pulled slightly away from the pan.
Step 4: Cool and Invert
Once baked, allow the cake to cool in the pan for about 10 minutes—this rest helps the caramelized cherry topping set and makes flipping easier. Place a large serving platter or baking sheet over the pan, then carefully flip the two together to invert the cake. Lift the pan off to reveal a stunning chocolate cherry topping glistening on top, ready to be sliced and adored.
How to Serve Chocolate Cherry Upside Down Cake

Garnishes
This cake is charming on its own, but try adding a dollop of freshly whipped cream or a scoop of vanilla ice cream to complement the warm cherries and chocolate. A sprinkle of toasted almonds or a few fresh cherries can add texture and brighten the presentation for extra wow factor.
Side Dishes
Pair your Chocolate Cherry Upside Down Cake with a light latte or a cup of freshly brewed coffee to balance the richness. If serving after dinner, a glass of ruby-port or a rich red wine can also elevate the dessert experience beautifully.
Creative Ways to Present
For special occasions, try serving individual portions in small ramekins for personalized upsides. Alternatively, drizzle a bit of chocolate ganache over the top or dust with powdered sugar for a festive look. Layered with fresh mint leaves, this cake turns into an elegant centerpiece that invites eager forks.
Make Ahead and Storage
Storing Leftovers
Leftover Chocolate Cherry Upside Down Cake will stay moist and delicious when covered tightly with plastic wrap or foil at room temperature for up to 2 days. If your kitchen is warm, storing it in an airtight container in the fridge is a smart choice to keep it fresh.
Freezing
If you want to enjoy this cake later, it freezes wonderfully. Wrap the cooled cake tightly with plastic wrap and then foil, or place in a freezer-safe container. Freeze for up to 2 months. To thaw, leave it overnight in the refrigerator, then bring to room temperature before serving.
Reheating
Warm slices gently in the microwave for about 20-30 seconds or until just heated through, which brings back that fresh-from-the-oven feeling. Reheating also reactivates the gooey cherry topping, making each bite as good as the first.
FAQs
Can I use fresh cherries instead of cherry pie filling?
Absolutely! If using fresh cherries, make sure to pit them and cook them down slightly with sugar to mimic the sweetness and syrupiness of pie filling, which helps create that classic upside-down cake glaze.
Is it possible to make this cake gluten-free?
Yes, just swap the regular chocolate cake mix for a gluten-free alternative, making sure it’s designed for one-to-one substitution. The rest of the ingredients remain the same for that fantastic Chocolate Cherry Upside Down Cake experience.
What type of chocolate cake mix works best?
Any standard chocolate cake mix from the store works well, but ones labeled as “moist” or “fudge” tend to create an extra decadent crumb, enhancing the lusciousness beneath the cherry topping.
Can I make this cake in a different size pan?
You can use smaller or larger pans, but adjust the baking time accordingly—less time for smaller pans, more for larger ones. Just make sure the batter covers the cherry topping evenly to keep that signature upside-down look.
How do I avoid sticking when flipping the cake?
Be sure to grease your pan thoroughly before layering the butter and sugar, and give the cake about 10 minutes to cool after baking. These steps help the topping release smoothly when you invert it onto the serving platter.
Final Thoughts
The Chocolate Cherry Upside Down Cake is a guaranteed crowd-pleaser that combines indulgent chocolate, bright cherries, and delightful caramelized sweetness in one pan. It’s easy enough for a weeknight treat but impressive enough for celebrations and gatherings. Give this recipe a try and enjoy sharing the warmth and joy it brings with everyone at your table.
PrintChocolate Cherry Upside Down Cake Recipe
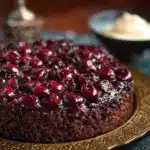
This delightful Chocolate Cherry Upside Down Cake combines rich, moist chocolate cake with a luscious cherry topping. The sweet cherry pie filling caramelizes with brown sugar and butter, creating a gooey, fruity layer that perfectly complements the deep chocolate flavor. Easy to prepare and perfect for any occasion, this cake is sure to impress your family and friends.
- Prep Time: 15 minutes
- Cook Time: 35-40 minutes
- Total Time: 50-55 minutes
- Yield: 12 servings 1x
- Category: Dessert
- Method: Baking
- Cuisine: American
- Diet: Vegetarian
Ingredients
Topping
- 1 can (21 oz) cherry pie filling
- 1/4 cup unsalted butter, melted
- 1/4 cup brown sugar
Cake Batter
- 1 box chocolate cake mix (about 15.25 oz)
- 3 large eggs
- 1/2 cup vegetable oil
- 1 cup water
- 1 teaspoon vanilla extract
Instructions
- Prepare the Topping: Preheat your oven to 350°F (175°C). Grease a 9×13-inch baking pan to prevent the cake from sticking.
- Create the Base Layers: Pour the melted butter into the bottom of the prepared pan. Sprinkle the brown sugar evenly over the melted butter to create a caramel layer.
- Add Cherry Pie Filling: Spread the cherry pie filling evenly over the brown sugar layer, ensuring an even fruit distribution for flavor and presentation.
- Make the Cake Batter: In a large mixing bowl, combine the chocolate cake mix, eggs, vegetable oil, water, and vanilla extract. Mix thoroughly until the batter is smooth and uniform.
- Assemble the Cake: Carefully pour the prepared cake batter over the cherry pie filling layer in the baking pan, spreading it out evenly for consistent baking.
- Bake the Cake: Bake the cake in the preheated oven for 35-40 minutes. To test doneness, insert a toothpick into the center; it should come out clean or with a few moist crumbs.
- Cool and Invert: Allow the cake to cool in the pan for about 10 minutes. Then, place a large serving platter over the baking pan and carefully invert the cake onto the platter, revealing the cherry topping. Serve warm or at room temperature.
Notes
- You can use fresh or thawed frozen cherries as a substitute for canned cherry pie filling if preferred.
- Letting the cake cool slightly before inverting helps prevent the topping from sliding off.
- For added texture, sprinkle chopped nuts (such as pecans or walnuts) over the brown sugar before adding cherry pie filling.
- Store leftovers covered at room temperature for up to 2 days or refrigerate for up to 5 days.
- Reheat slices briefly in the microwave or oven for a warm dessert experience.
Nutrition
- Serving Size: 1 slice (1/12 of cake)
- Calories: 320 kcal
- Sugar: 38 g
- Sodium: 280 mg
- Fat: 14 g
- Saturated Fat: 3 g
- Unsaturated Fat: 10 g
- Trans Fat: 0 g
- Carbohydrates: 47 g
- Fiber: 2 g
- Protein: 3 g
- Cholesterol: 45 mg
Keywords: chocolate cherry cake, upside down cake, cherry dessert, chocolate cake recipe, easy dessert, fruit upside down cake