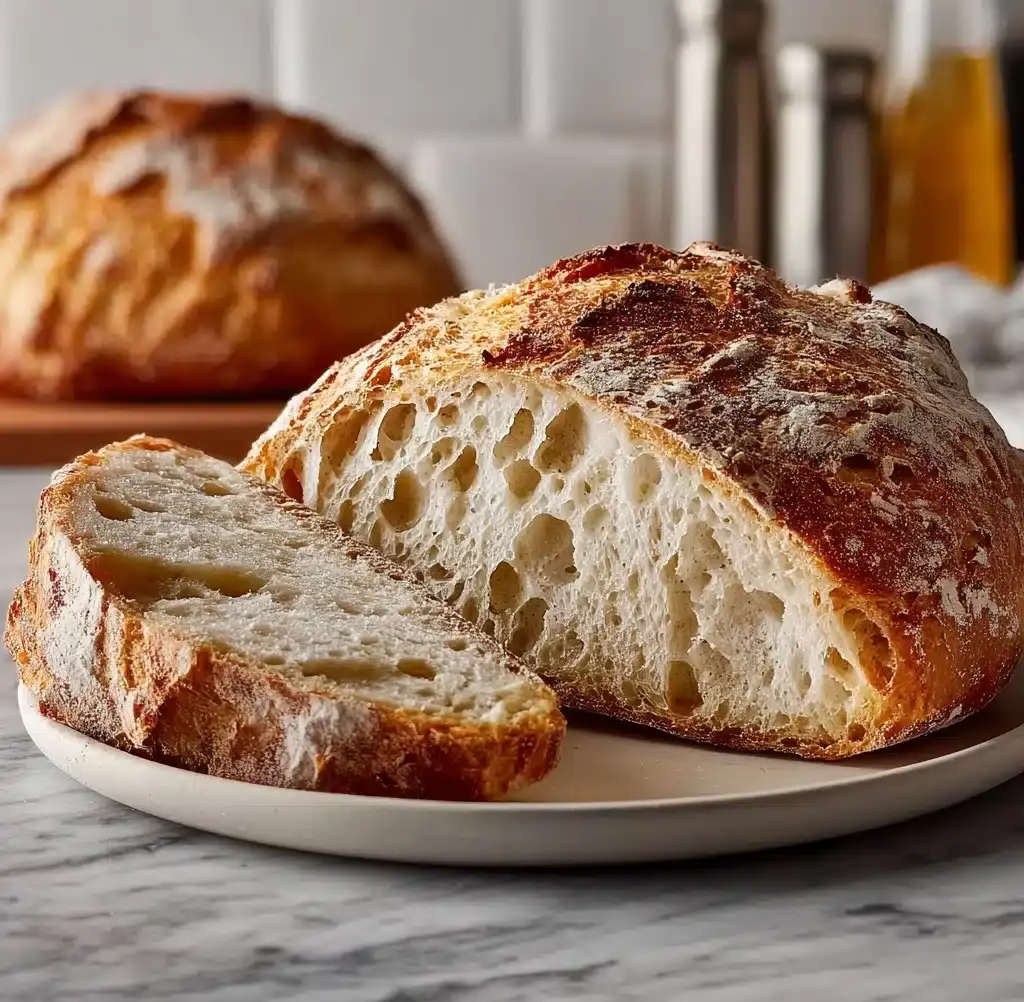
Crusty Golden Sourdough Bread with a Soft Chewy Center Recipe
If you have ever dreamed of baking your own bakery-quality loaf at home, then you are in for a real treat with this Crusty Golden Sourdough Bread with a Soft Chewy Center. This bread brings together the best of both worlds: a beautifully crisp, golden crust that crackles under your fingertips and an irresistibly soft, chewy interior that melts in your mouth. Whether you are a seasoned baker or a complete novice, the magic of its flavor and texture will have you coming back to the kitchen time and again, eager to experience that warm, tangy, and deeply satisfying slice fresh from the oven.

Ingredients You’ll Need
Great bread always starts with simple, quality ingredients that work harmoniously to create that signature taste and texture. Each element plays a crucial role in building your Crusty Golden Sourdough Bread with a Soft Chewy Center, ensuring every bite is a delight.
- 4 cups (500g) bread flour or all-purpose flour: The foundation of your loaf, providing the gluten structure for chewiness and rise.
- 1⅔ cups (375g) warm water: Hydrates the flour and activates the wild yeast in your starter.
- 1 cup (200g) active sourdough starter: The natural leavening agent that brings flavor, rise, and that quintessential sourdough tang.
- 2 teaspoons (10g) salt: Enhances flavor and tightens gluten for a perfect crumb.
How to Make Crusty Golden Sourdough Bread with a Soft Chewy Center
Step 1: Mixing the Flour and Water
Start by combining the flour and warm water in a large mixing bowl. Stir until you have a shaggy, loosely mixed dough—don’t worry that it looks rough at this stage. This initial blend begins gluten development and allows the flour to absorb the water fully, which is essential for that chewy center.
Step 2: Resting the Dough (Autolyse)
Let this shaggy mixture rest for 30 minutes. This pause gives the flour time to hydrate completely and improves dough extensibility, helping to create those lovely air pockets inside your bread’s soft center.
Step 3: Adding the Starter and Salt
After your dough has rested, introduce the active sourdough starter and salt. Mix thoroughly until every bit is fully incorporated. The starter brings the natural fermentation that gives your bread flavor complexity and strength, while the salt balances that tang and enhances gluten structure.
Step 4: Bulk Fermentation with Stretch and Folds
Cover the bowl and leave your dough at room temperature. Every 30 minutes over the next two hours, perform a series of stretch and folds: gently pull one side of the dough upward and fold it over itself, then rotate the bowl a quarter turn and repeat until you’ve folded on all four sides. This process gently strengthens the dough’s gluten network, essential for that chewy middle and sturdy crust.
Step 5: Long Rise
After the final stretch and fold, cover the bowl again and allow the dough to rise for 6 to 8 hours. The dough should double in size and reveal lots of bubbles—nature’s signature that your bread is developing character and flavor.
Step 6: Shaping the Loaf
Carefully turn the dough out onto a floured surface to avoid deflating all those precious bubbles. Shape it into a round or oval loaf by folding and tucking the edges underneath to create surface tension. This careful shaping helps it rise beautifully in the oven and creates the crackly crust you love.
Step 7: Cold Proofing
Place the shaped loaf seam-side up into a floured proofing basket or a towel-lined bowl. Cover and refrigerate for 8 to 12 hours. This slow, cold fermentation deepens flavor and improves the dough’s texture, ensuring that unbeatable Crusty Golden Sourdough Bread with a Soft Chewy Center.
Step 8: Baking Day Prep
Preheat your oven to 450°F (232°C) with a Dutch oven inside—this traps steam and simulates a professional bread oven environment. Take the dough out of the fridge, place it on parchment paper, and score the top with a sharp knife. Scoring allows the bread to expand properly and adds to its rustic appearance.
Step 9: Baking
Carefully lower your dough into the heated Dutch oven using the parchment paper. Cover and bake for 20 minutes, then remove the lid and bake another 25 minutes uncovered. This two-stage bake creates that signature crusty golden exterior while ensuring the inside stays soft and chewy.
Step 10: Cooling
Once out of the oven, let your loaf cool completely on a wire rack before slicing. Patience here is key—the crumb continues to set, and your Crusty Golden Sourdough Bread with a Soft Chewy Center will slice perfectly, showcasing its tender, flavorful heart.
How to Serve Crusty Golden Sourdough Bread with a Soft Chewy Center
Garnishes
A simple brush of high-quality olive oil or a sprinkle of sea salt flakes right after baking can elevate your sourdough experience. Fresh herbs like rosemary or thyme pressed lightly into the dough before baking also add an aromatic twist.
Side Dishes
This bread pairs wonderfully with everything from hearty soups, creamy cheeses, and vibrant salads. Imagine dunking a chunk into a spiced tomato soup or layering it with melting brie and fresh figs—the possibilities are endless.
Creative Ways to Present
Transform your loaf into a centerpiece by making rustic bruschetta, slicing it thick for open-faced sandwiches, or turning it into croutons to scatter over your favorite salad. It’s a crowd-pleaser that looks as fantastic as it tastes.
Make Ahead and Storage
Storing Leftovers
Keep your bread fresh by wrapping it loosely in a kitchen towel or paper bag at room temperature to maintain the crust while preventing the crumb from drying out. Avoid plastic wrap, which can make the crust soggy.
Freezing
To freeze, slice your loaf and place pieces in an airtight bag. This makes it easy to toast slices as needed without compromising quality. Frozen sourdough keeps well for up to three months without significant loss of flavor or texture.
Reheating
To bring back that Crusty Golden Sourdough Bread with a Soft Chewy Center freshness, reheat slices in a toaster or warm the whole loaf in a 350°F (175°C) oven for 10 minutes. This revives the crust’s crunch and softens the interior just enough.
FAQs
Why does my sourdough bread not get a crispy crust?
Achieving that crispy crust often depends on baking steam and temperature. Using a covered Dutch oven traps steam, creating a moist environment that lets the crust develop fully. Also, make sure not to underbake; a longer uncovered bake helps the crust brown and crisp up.
Can I use all-purpose flour instead of bread flour?
Yes, you can substitute all-purpose flour. Bread flour has higher protein which usually produces more chew and better rise, but all-purpose flour is quite flexible and still delivers excellent results for your Crusty Golden Sourdough Bread with a Soft Chewy Center.
How do I know if my sourdough starter is active enough?
A good test is the float test: drop a small spoonful of starter into water; if it floats, it’s airy and ready to leaven bread. Using a vigorous, bubbly starter is key to a good rise and flavor.
Can I speed up the fermentation process?
While faster fermentation might be tempting, slow fermentation develops better flavor and texture. Warmer temperatures speed it up but risk losing complexity and can compromise the crumb and crust balance.
Why does the bread have large holes inside?
Large holes usually result from proper gluten development and good fermentation. While some prefer a uniform crumb, those delicious irregular pockets are a hallmark of artisan sourdough, contributing to a wonderfully chewy and airy texture.
Final Thoughts
There is truly something magical about pulling a freshly baked loaf of Crusty Golden Sourdough Bread with a Soft Chewy Center from your oven. Each step, from mixing to cooling, builds toward that perfect harmony of flavor, texture, and aroma. So, roll up your sleeves and dive into this rewarding journey—you deserve the delicious satisfaction that comes from your very own homemade sourdough masterpiece.
PrintCrusty Golden Sourdough Bread with a Soft Chewy Center Recipe
This Crusty Golden Sourdough Bread features a beautifully crunchy exterior with a soft, chewy center, perfect for sandwiches, toast, or enjoying plain. Made with simple ingredients, this artisanal bread requires patience and a few techniques like stretch and fold and cold fermentation to develop complex flavors and a perfect crumb.
- Prep Time: 45 minutes
- Cook Time: 45 minutes
- Total Time: 16 to 20 hours (including fermentation and proofing)
- Yield: 1 loaf (about 1.5 to 2 pounds) 1x
- Category: Bread
- Method: Baking
- Cuisine: Artisan / Sourdough
- Diet: Vegetarian
Ingredients
Dry Ingredients
- 4 cups (500g) bread flour or all-purpose flour
- 2 teaspoons (10g) salt
Wet Ingredients
- 1⅔ cups (375g) warm water
- 1 cup (200g) active sourdough starter
Instructions
- Mix flour and water: In a large mixing bowl, combine 4 cups of flour and 1⅔ cups of warm water. Stir until a shaggy dough forms, then let it rest for 30 minutes to hydrate the flour fully.
- Add starter and salt: After resting, add 1 cup of active sourdough starter and 2 teaspoons of salt to the dough. Mix well until fully combined.
- Initial fermentation with stretch and folds: Cover the bowl with a clean towel or plastic wrap. Let the dough sit at room temperature. Every 30 minutes, for 2 hours, perform stretch and folds by pulling one side of the dough upward and folding it over itself. Turn the bowl a quarter turn and repeat three more times.
- Bulk fermentation: After the final fold, cover the bowl again and let the dough rise for 6 to 8 hours, until it doubles in size and becomes bubbly and puffy.
- Shape the dough: Gently transfer the dough to a lightly floured surface. Shape it into a round or oval loaf by folding and tucking the edges underneath, creating surface tension.
- Proof in basket: Place the shaped dough seam-side up into a floured proofing basket or a bowl lined with a floured towel. Cover and refrigerate for 8 to 12 hours for a cold ferment and flavor development.
- Preheat oven and Dutch oven: The next day, place a Dutch oven into your oven and preheat to 450°F (232°C) to get it very hot.
- Prepare dough for baking: Remove the dough from the fridge and carefully turn it out onto parchment paper. Score the top of the dough with a sharp knife or razor blade to allow for oven spring.
- Bake covered: Using the parchment paper, lower the dough into the hot Dutch oven. Cover and bake for 20 minutes.
- Bake uncovered: Remove the lid and bake the bread uncovered for another 25 minutes, allowing the crust to become golden and crusty.
- Cool before slicing: Remove the bread from the Dutch oven and let it cool completely on a wire rack before slicing to ensure the crumb sets perfectly.
Notes
- Make sure your sourdough starter is active and bubbly before using for best rise and flavor.
- Adjust hydration slightly depending on your flour type; some flours absorb more water.
- Cold fermentation in the fridge helps develop deeper flavor and improves crust texture.
- Use a sharp blade to score the dough to prevent tearing and allow controlled expansion.
- Allowing the bread to cool completely helps the crumb finish cooking and prevents gumminess.
Nutrition
- Serving Size: 1 slice (about 56g)
- Calories: 150
- Sugar: 0.2g
- Sodium: 250mg
- Fat: 0.8g
- Saturated Fat: 0.1g
- Unsaturated Fat: 0.6g
- Trans Fat: 0g
- Carbohydrates: 31g
- Fiber: 2g
- Protein: 5g
- Cholesterol: 0mg
Keywords: sourdough bread, crusty bread, artisan bread, homemade bread, sourdough recipe, chewy bread, Dutch oven bread